No-Bake Peanut Butter Oat Cups – 7 Irresistible Treats You’ll Love Instantly Recipe
If you are craving a sweet, wholesome, and utterly delightful snack, the No-Bake Peanut Butter Oat Cups – 7 Irresistible Treats You’ll Love Instantly Recipe is exactly what you need. This recipe brings together creamy peanut butter, hearty oats, and a touch of natural sweetness to create bite-sized treats that are as satisfying as they are easy to make. Perfect for a quick energy boost, a lunchbox addition, or a guilt-free dessert, these no-bake cups combine texture and flavor in a way that will have you reaching for more with every bite.

Ingredients You’ll Need
Getting these irresistible treats on your table is a breeze thanks to a handful of simple, pantry-friendly ingredients that each play a crucial role. From the nutty richness of peanut butter to the chewy goodness of oats, every ingredient contributes to creating the perfect balance of taste, texture, and color.
- Peanut Butter: The creamy, nutty base that binds everything together and delivers rich flavor.
- Rolled Oats: Provides a hearty, wholesome texture that keeps these cups satisfyingly chewy.
- Honey or Maple Syrup: Adds natural sweetness and helps the mixture stick without overpowering it.
- Vanilla Extract: Enhances the overall flavor with a lovely aromatic note.
- Chia Seeds or Flaxseeds: Optional but fantastic for added nutrition and slight crunch.
- Dark Chocolate Chips or Mini Chocolate Chunks: A delightful contrast that adds a touch of indulgence.
- Salt: A pinch to balance the sweetness and elevate the peanut butter flavor.
How to Make No-Bake Peanut Butter Oat Cups – 7 Irresistible Treats You’ll Love Instantly Recipe
Step 1: Prepare the Binding Mixture
Start by combining your peanut butter and honey or maple syrup in a microwave-safe bowl. Warm this mixture gently until it’s smooth and pourable—usually about 20 seconds—which helps everything blend beautifully in the next step. This binding mixture is the heart of your oat cups, ensuring they hold together firmly without baking.
Step 2: Mix in the Dry Ingredients
Next, stir in rolled oats, vanilla extract, and a pinch of salt. If you’re adding chia seeds or flaxseeds, now is the time. These seeds not only elevate the nutritional profile but also add interesting texture and subtle nuttiness, making every bite more satisfying. Fold everything together with care to evenly coat the oats with the sticky peanut butter mixture.
Step 3: Add the Chocolate Surprise
Sprinkle dark chocolate chips or mini chocolate chunks into the mixture, stirring gently so the chocolate is distributed but not melted. This little indulgence brings a wonderful contrast in taste that perfectly complements the peanut butter and oats, making each cup feel like a treat you deserve.
Step 4: Shape Your Cups
Using a spoon or your hands, press the mixture into mini muffin liners or silicone molds. Firmly packing the mixture ensures that the cups hold their shape once chilled. This step is not only fun but satisfying as you see your treats take shape with ease.
Step 5: Chill Until Set
Place your molded cups in the refrigerator for at least 30 minutes to harden. This chilling period is key—it lets the peanut butter firm up and the oats absorb just the right amount of moisture, resulting in a perfectly textured, grab-and-go snack you can enjoy instantly or keep ready for whenever hunger strikes.
How to Serve No-Bake Peanut Butter Oat Cups – 7 Irresistible Treats You’ll Love Instantly Recipe

Garnishes
A sprinkle of sea salt, extra chopped peanuts, or a drizzle of melted chocolate can take your peanut butter oat cups from delicious to downright irresistible. These small touches not only add a boost of texture and flavor but make your treats look beautifully inviting, perfect for sharing with friends or serving at a gathering.
Side Dishes
While these cups shine brilliantly as a standalone snack, pairing them with a dollop of Greek yogurt or a fresh fruit salad provides a delightful balance. The creamy yogurt complements the richness, while bright, fresh fruit adds a juicy contrast and a pop of vibrant color on your plate.
Creative Ways to Present
For a fun and creative twist, arrange the oat cups in a colorful box as homemade gifts, or stack them neatly on a dessert platter lined with parchment paper. Wrapping individual cups in wax paper tied with twine makes for a charming presentation whether you’re stuffing lunchboxes or hosting a cozy get-together.
Make Ahead and Storage
Storing Leftovers
These cups keep wonderfully in an airtight container at room temperature for up to a week. Keeping them sealed maintains their chewy texture and prevents them from drying out, making it easy to enjoy a quick snack any time without compromising freshness.
Freezing
Want to make a bigger batch to savor later? No problem! Freeze your peanut butter oat cups in a single layer initially to avoid sticking, then transfer to a freezer-safe container or bag. When stored this way, they keep well for up to 3 months and thaw quickly at room temperature.
Reheating
Since these are no-bake treats, reheating isn’t necessary. However, if you prefer your cups a little softer, leaving them at room temperature for about 10 minutes will do the trick. Avoid microwaving to maintain their perfect texture and flavor.
FAQs
Can I substitute peanut butter with another nut butter?
Absolutely! Almond butter, cashew butter, or sunflower seed butter all work beautifully and add their unique nutty flavors. Just make sure to choose a creamy variety to achieve the best texture.
Are these oat cups gluten-free?
They can be if you use certified gluten-free oats. Regular oats may sometimes be cross-contaminated, so check the packaging if gluten-free is a must for you.
How do I make these cups vegan?
Simply swap the honey for maple syrup or agave nectar to keep them entirely plant-based without sacrificing sweetness or binding quality.
Can I add other mix-ins like nuts or dried fruit?
Yes! Chopped nuts or dried cranberries and raisins add extra texture and bursts of flavor. Just be mindful to adjust quantities so the mixture still holds together well.
Are these cups suitable for meal prep or post-workout snacks?
Definitely! They are packed with protein and fiber, offering a sustained energy boost, making them perfect for breakfast on-the-go, a pre-workout snack, or a healthy treat anytime.
Final Thoughts
If you’ve been searching for a fuss-free yet incredibly tasty snack, dive into the No-Bake Peanut Butter Oat Cups – 7 Irresistible Treats You’ll Love Instantly Recipe today. These cups are a celebration of simplicity and flavor, and once you try them, I’m sure they will quickly become a beloved staple in your snack rotation. So grab your ingredients, have fun making them, and most importantly—enjoy every delicious bite!
Print
No-Bake Peanut Butter Oat Cups – 7 Irresistible Treats You’ll Love Instantly Recipe
- Total Time: 35 minutes
- Yield: 4 servings 1x
Description
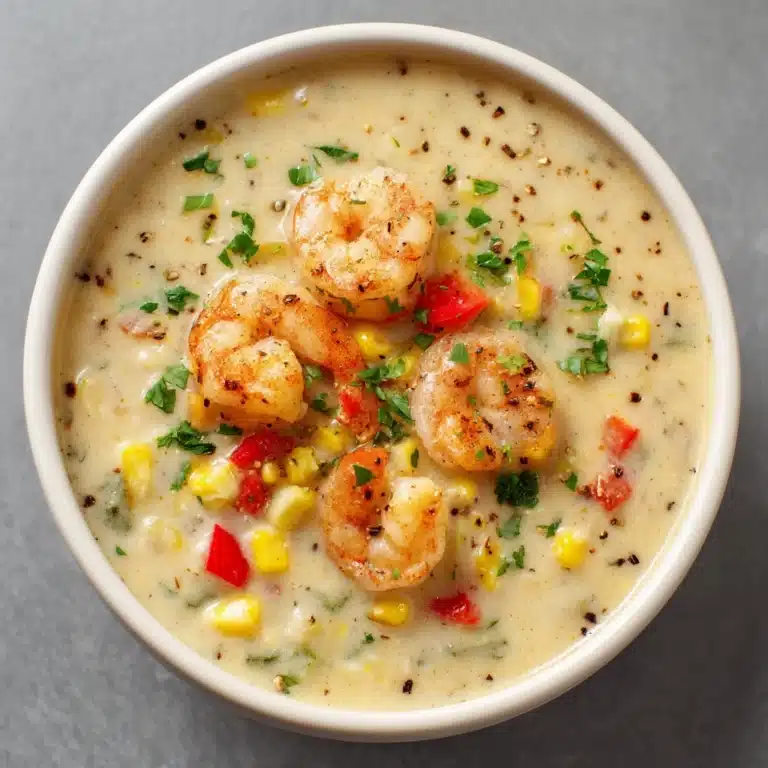
A flavorful one-pan shrimp and rice dish cooked on the stovetop featuring tender shrimp simmered with aromatic spices and fresh parsley. This quick and satisfying meal combines sautéed onions, garlic, and perfectly cooked long-grain white rice infused with paprika and a touch of lemon juice for brightness.
Ingredients
Seafood and Protein
- 1 lb large shrimp, peeled and deveined
Vegetables and Aromatics
- 1 small onion, diced
- 3 cloves garlic, minced
- 2 tablespoons chopped parsley
Grains and Liquids
- 1 cup long-grain white rice
- 2 cups chicken or vegetable broth
Fats and Oils
- 1 tablespoon olive oil
- 1 tablespoon butter
Seasonings
- 1/2 teaspoon paprika
- 1/2 teaspoon salt
- 1/4 teaspoon black pepper
- 1/4 teaspoon crushed red pepper flakes (optional)
- Juice of 1/2 lemon
Instructions
- Sauté onions: In a large skillet, heat olive oil and butter over medium heat. Add diced onion and cook for 3–4 minutes until softened and translucent.
- Add garlic and rice: Stir in minced garlic and long-grain white rice. Sauté for 1–2 minutes until the rice is lightly toasted and the garlic becomes fragrant.
- Simmer with broth and spices: Pour in the chicken or vegetable broth. Add paprika, salt, black pepper, and crushed red pepper flakes if using. Bring the mixture to a simmer, cover the skillet with a lid, reduce the heat to low, and cook for 15 minutes.
- Cook shrimp: After 15 minutes, remove the lid and gently stir the rice. Nestle the peeled and deveined shrimp on top of the rice. Cover again and cook for an additional 5–7 minutes until the shrimp turn pink and are fully cooked, and the liquid has been absorbed.
- Finish and serve: Remove the skillet from heat. Drizzle fresh lemon juice over the shrimp and rice, then sprinkle chopped parsley on top. Serve immediately and enjoy.
Notes
- Use either chicken or vegetable broth depending on dietary preferences.
- Crushed red pepper flakes are optional for added heat.
- Ensure shrimp are peeled and deveined for the best texture and ease of eating.
- Serve with a side of steamed vegetables or a fresh salad for a balanced meal.
- Prep Time: 10 minutes
- Cook Time: 25 minutes
- Category: Main Course
- Method: Stovetop
- Cuisine: American


