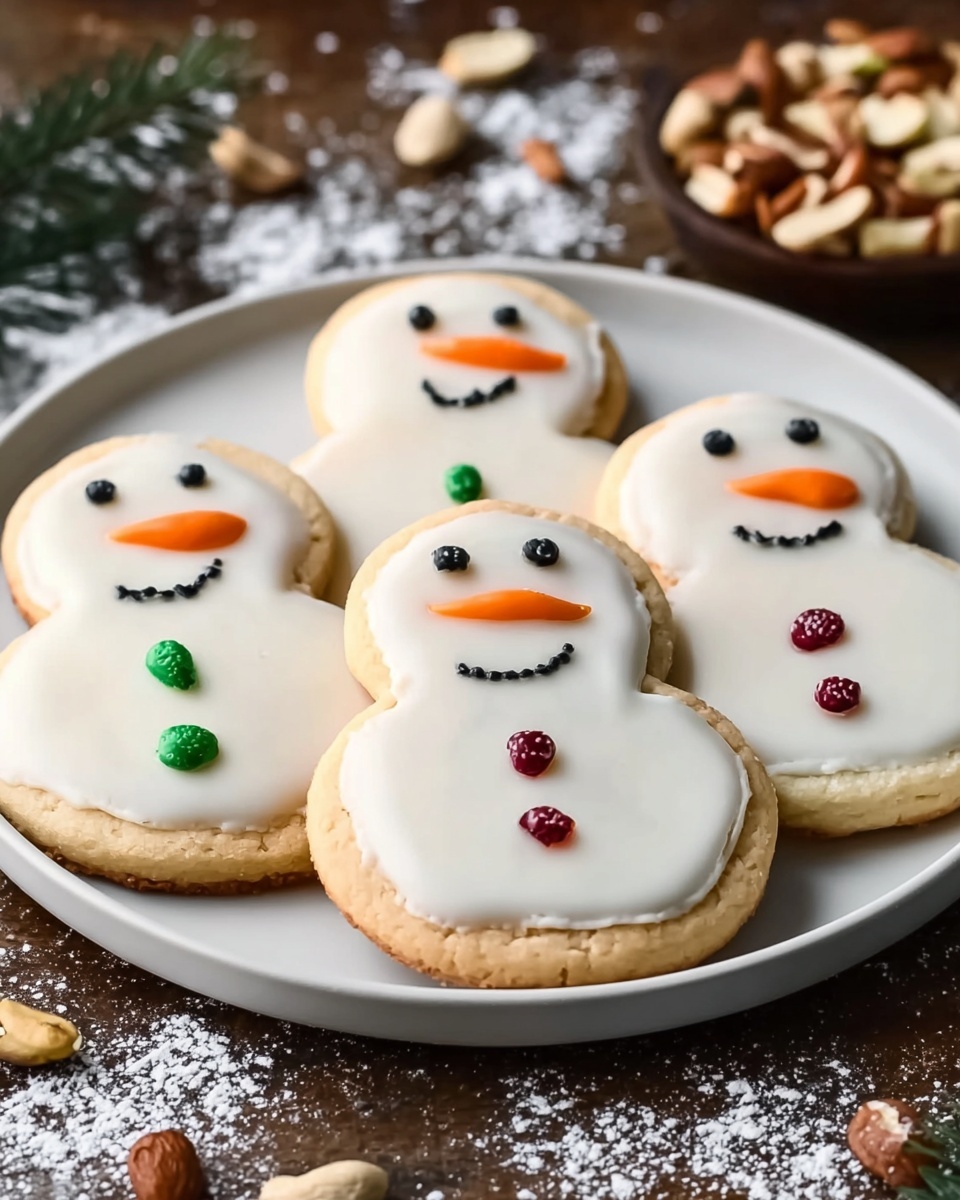
Melted Snowman Cookies Recipe
If you’re looking to bring some whimsy and sweetness to your holiday table, the Melted Snowman Cookies Recipe is exactly what you need. These adorable treats capture the magic of winter with sugar cookies topped with royal icing and delightful decorations that look like a snowman melting in the warm sunshine. Each bite is an irresistible blend of soft marshmallow, colorful candies, and sweet glaze, making these cookies a joyful and festive highlight for any gathering.
Ingredients You’ll Need
Getting started with the Melted Snowman Cookies Recipe is a breeze thanks to the simple, thoughtful ingredients that come together beautifully. Each component adds its own charm—soft cookies provide the perfect base, the royal icing brings sweetness and structure, and the fun toppings give personality to each snowman.
- 12 sugar cookies: Use either store-bought or homemade cookies as the delicious foundation for your snowmen.
- 2 cups royal icing: This sweet, glossy icing adds a smooth surface that helps hold your decorations in place.
- 6 marshmallows, cut in half: These form the melting snowman’s body, adding fluffy texture and charm.
- Long orange sprinkles: Perfect for crafting the snowman’s iconic carrot nose with a pop of color.
- M&Ms: Use them as cheerful buttons, adding vibrant accents that your guests will love.
- Black gel food color: Essential for drawing expressive eyes and mouths, giving each snowman a unique personality.
How to Make Melted Snowman Cookies Recipe
Step 1: Prepare Your Cookies
Start with a batch of your favorite sugar cookies, either from scratch or store-bought. Lay them out on a flat surface for decorating, making sure they have cooled completely if freshly baked. The cookie base is your blank canvas—so sturdy and sweet, it perfectly supports all the fun decorations to come.
Step 2: Spread the Royal Icing
Using a spatula or the back of a spoon, generously spread the royal icing over the top of each cookie. This icing will mimic the melted snow that holds the rest of the snowman together. Aim for a smooth, even layer to create that inviting, glossy “snow” effect.
Step 3: Add Marshmallow “Melting” Bodies
Take the marshmallow halves and gently press two halves together vertically on each cookie. Position them so they overlap slightly, giving that perfect “melting” snowman shape. The marshmallows’ pillowy softness contrasts delightfully with the firm cookie and icing beneath.
Step 4: Decorate the Snowman’s Features
Next, use the black gel food coloring to draw small dots for eyes and a smile on each marshmallow. Then, carefully place one long orange sprinkle in the middle for a carrot nose. Finally, press three colorful M&Ms vertically down the marshmallow “body” to resemble cheerful buttons. These small details bring each snowman to life wonderfully.
Step 5: Let the Cookies Set
Allow your decorated cookies to sit at room temperature until the royal icing hardens slightly and all decorations are securely in place. This step ensures that your Melted Snowman Cookies Recipe is ready to handle and enjoy without losing a bit of their charm.
How to Serve Melted Snowman Cookies Recipe

Garnishes
For an extra touch of festive flair, sprinkle powdered sugar lightly over your cookies to give the illusion of fresh snow dusting. You can also add tiny edible glitter accents on the marshmallow melon “snow” to catch the light and add sparkle to your presentation.
Side Dishes
These cookies pair wonderfully with warm drinks like hot cocoa topped with whipped cream or a cinnamon-spiced latte. The melty sweetness of the cookies complements cozy beverages perfectly, making for a winter snack that’s both comforting and fun.
Creative Ways to Present
Present your Melted Snowman Cookies Recipe on a rustic wooden board with sprigs of evergreen or holly berries to invoke holiday cheer. Alternatively, arrange them on a snowflake-patterned platter alongside other winter-themed treats to create a festive dessert table that will wow your guests.
Make Ahead and Storage
Storing Leftovers
If you have any leftovers, store your Melted Snowman Cookies in an airtight container at room temperature for up to three days. This keeps the cookies soft and the decorations intact, so each bite remains as delightful as when freshly made.
Freezing
You can also freeze these cookies if you want to prepare ahead of time. Place them in a single layer on a baking sheet to freeze, then transfer to a resealable freezer bag or container. When properly sealed, they will keep for up to one month without losing their charm.
Reheating
For the best taste and texture after freezing, let the cookies thaw at room temperature before serving—no reheating needed. This allows the marshmallows and icing to return gently to their ideal softness and appearance.
FAQs
Can I use different shaped cookies for this recipe?
Absolutely! While round sugar cookies work best to mimic a melting snowman’s shape, feel free to experiment with star or heart shapes for a creative twist on the Melted Snowman Cookies Recipe.
Is royal icing necessary, or can I use another icing?
Royal icing is recommended because it hardens well, helping decorations stay in place. However, you can try a thick buttercream or glaze, but keep in mind it may not set as firmly.
Can I make these cookies vegan?
Yes, just substitute vegan sugar cookies and use a vegan-friendly marshmallow and icing alternative. This lets everyone enjoy the fun and festive spirit of the Melted Snowman Cookies Recipe.
What’s the best way to pipe the black gel for the eyes and mouth?
Using a toothpick or a very fine piping tip helps you draw small, precise dots and lines to create expressive faces on each snowman’s marshmallow body.
How long do these cookies stay fresh?
Stored properly in an airtight container at room temperature, these delightful treats remain fresh for about three days, giving you plenty of time to enjoy the magic of the Melted Snowman Cookies Recipe.
Final Thoughts
There’s truly something special about the Melted Snowman Cookies Recipe that brings warmth and joy to any occasion. They’re simple to make, charming to look at, and utterly delicious to eat—perfect for sharing with family and friends near or far. I hope you give these festive cookies a try and create sweet memories just like I did!
Print
Melted Snowman Cookies Recipe
- Total Time: 20 minutes
- Yield: 12 servings 1x
- Diet: Vegetarian
Description
These Melted Snowman Cookies are a fun and festive holiday treat featuring soft sugar cookies decorated with royal icing, marshmallows, and colorful candy accents to look like adorable melting snowmen. They are perfect for Christmas parties, family gatherings, or as a creative winter dessert.
Ingredients
Cookies and Decorations
- 12 sugar cookies (store-bought or homemade)
- 6 marshmallows, cut in half
- Long orange sprinkles (for the snowman’s nose)
- M&Ms (for buttons)
Royal Icing
- 2 cups royal icing
- Black gel food color
Instructions
- Prepare the Royal Icing: Divide the 2 cups of royal icing into two bowls. Leave one bowl white and color the other with black gel food coloring to create the black icing for the eyes and mouth of the snowman.
- Apply Base Layer: Using a spoon or piping bag, spread a generous layer of white royal icing over each sugar cookie evenly to cover the surface.
- Add Marshmallow Head: Place one half of a marshmallow onto each cookie top center, pressing slightly so it adheres to the icing.
- Create Face Details: Use the black royal icing to pipe small dots on the marshmallow halves to make the eyes and mouth of the snowman.
- Attach the Nose: Stick a long orange sprinkle into the center of the marshmallow half to look like the snowman’s carrot nose.
- Decorate the Buttons: Press M&Ms into the white icing below the marshmallow head to form buttons down the front of the snowman’s melted body.
- Allow to Set: Let the decorated cookies sit at room temperature for at least 1 hour to allow the royal icing to harden fully.
Notes
- You can make your own sugar cookies from scratch or use store-bought ones for convenience.
- Royal icing dries best when left uncovered at room temperature for several hours.
- Use gel food coloring instead of liquid to avoid thinning out the icing.
- Adjust the number of M&Ms depending on the size of your cookies and how many buttons you want.
- These cookies are best enjoyed within 3 days and should be stored in an airtight container.
- Prep Time: 10 minutes
- Cook Time: 10 minutes
- Category: Dessert
- Method: No-Cook
- Cuisine: American


