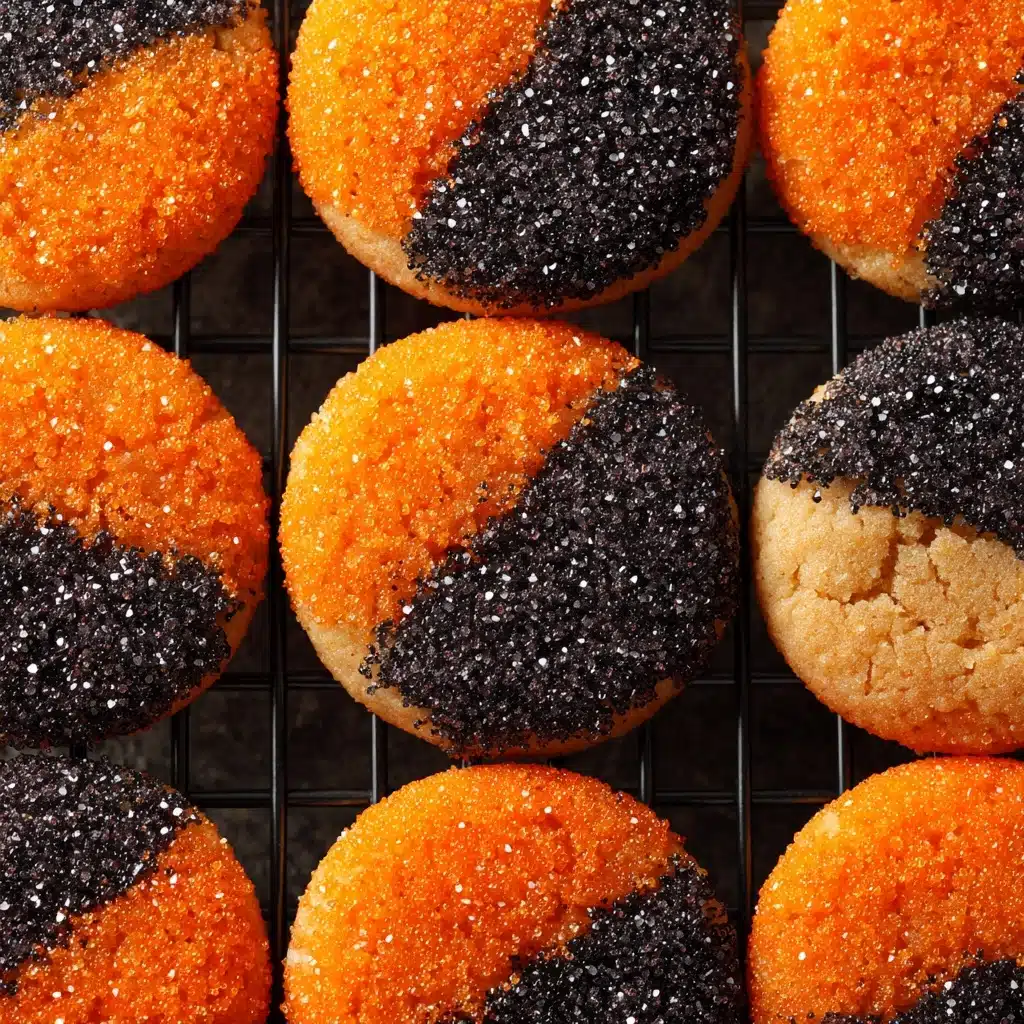
Halloween Sugar Cookies Recipe
If there’s one treat that captures the playful spirit of October, it’s Halloween Sugar Cookies. These cookies are a riot of color and fun, boasting perfectly crisp edges, a tender interior, and endless opportunities for decorating. Whether you’re making them for a festive party, a classroom celebration, or just a cozy night in with a scary movie, these cookies bring a little magic and a lot of smiles to every bite.

Ingredients You’ll Need
The beauty of Halloween Sugar Cookies lies in their simplicity—each ingredient pulls its weight to create cookies that are buttery, tender, and ready to be transformed into spooky works of art. Here’s what you’ll need and why each one matters:
- All-purpose flour: Provides structure, ensuring the cookies hold their shape while baking.
- Baking soda: Gives the cookies a little lift and helps them stay soft.
- Baking powder: Adds to the light, tender crumb.
- Salt: Balances the sweetness and enhances all the flavors.
- Unsalted butter (softened): The secret to rich, melt-in-your-mouth cookies.
- Granulated sugar: Adds sweetness and helps create that perfect cookie texture.
- Large egg: Binds everything together for a cohesive dough.
- Vanilla extract: Adds classic, aromatic warmth.
- Almond extract (optional): For a subtle, nutty twist that elevates the flavor.
- Milk: Keeps the dough pliable and easy to work with.
- Food coloring gels (orange, black, purple, green): Essential for getting those vivid, Halloween-ready hues without watering down your dough.
- Assorted Halloween sprinkles and candy eyes: Bring the festive, spooky spirit to life.
How to Make Halloween Sugar Cookies
Step 1: Prep Your Oven and Baking Sheets
Start by preheating your oven to 350°F (175°C). Line your baking sheets with parchment paper—this keeps the cookies from sticking and makes cleanup a breeze, so you can focus on the fun part: decorating!
Step 2: Mix the Dry Ingredients
In a medium bowl, whisk together the flour, baking soda, baking powder, and salt. This quick step ensures even distribution of the leavening agents, so each cookie bakes up just right.
Step 3: Cream Butter and Sugar
Grab a large mixing bowl and beat the softened butter with the sugar until the mixture is light and fluffy. This helps incorporate air, giving your Halloween Sugar Cookies their signature soft texture.
Step 4: Add Wet Ingredients
Mix in the egg, vanilla extract, almond extract (if you love a little extra flavor), and milk. The dough will become smooth and creamy, which means it’s ready for the dry ingredients.
Step 5: Combine Everything
Gradually add the dry mixture to the wet ingredients, mixing just until combined. Overmixing can toughen the cookies, so stop as soon as the last streaks of flour disappear.
Step 6: Color the Dough
Divide the dough into as many portions as you’d like colors. Add a few drops of food coloring gel to each, and stir until vibrant and evenly colored. This is where you can get creative—orange pumpkins, green monsters, purple witches, and black cats are all fair game!
Step 7: Shape and Decorate
Roll the dough into tablespoon-sized balls and space them about 2 inches apart on your prepared sheets. Gently flatten each ball with your palm or the bottom of a glass. If you’re adding sprinkles or candy eyes before baking, press them lightly into the dough now.
Step 8: Bake to Perfection
Bake for 8–10 minutes, just until the edges are set but not browned. The cookies will look slightly underdone in the center—that’s exactly what you want for a soft, tender bite. Cool on the baking sheet for 5 minutes before transferring to a wire rack.
Step 9: Cool and Decorate (Optional)
If you left your cookies plain, now’s the time to go wild with icing or more sprinkles. Let your imagination (and little helpers) run free!
How to Serve Halloween Sugar Cookies
Garnishes
For a festive finish, dust your Halloween Sugar Cookies with extra sprinkles, candy eyes, or a drizzle of royal icing. You can even pipe on spider webs, jack-o’-lantern faces, or witch hats for extra flair.
Side Dishes
These cookies are perfect alongside a mug of hot cocoa, apple cider, or even a glass of cold milk. If you’re hosting a party, try pairing them with caramel corn, popcorn balls, or a platter of fresh fruit for a sweet and spooky treat spread.
Creative Ways to Present
Pile your cookies high on a black cake stand, tuck them into cute treat bags for classroom gifts, or arrange them on a platter with Halloween-themed props like fake spiders or mini pumpkins. They also make a delightful edible centerpiece for any October gathering!
Make Ahead and Storage
Storing Leftovers
Keep your Halloween Sugar Cookies fresh by storing them in an airtight container at room temperature. They’ll stay soft and delicious for up to 5 days—if they last that long!
Freezing
These cookies freeze beautifully. Place cooled cookies in a single layer on a baking sheet to freeze, then transfer to a zip-top bag or airtight container. They’ll keep for up to 2 months. You can also freeze the dough (colored or plain) and bake fresh when the craving strikes.
Reheating
To enjoy cookies that taste just-baked, let frozen Halloween Sugar Cookies thaw at room temperature for about 30 minutes. If you prefer them warm, pop them in a 300°F oven for 2–3 minutes—just long enough to revive that irresistible softness.
FAQs
Can I use this recipe for cut-out Halloween Sugar Cookies?
Absolutely! Chill the dough for at least an hour, roll it out, and use your favorite Halloween cookie cutters. The shapes hold well, and they’re perfect for intricate decorating.
What’s the best way to get vibrant cookie colors?
Gel food coloring is your best friend here. It delivers bold, bright shades without adding extra liquid, so your dough stays the perfect consistency for shaping and baking.
Do I have to use almond extract?
Not at all! Almond extract is optional, but it adds a lovely depth of flavor. If you prefer a classic sugar cookie taste, just stick with vanilla extract.
Can I make Halloween Sugar Cookies ahead of time?
Yes! The dough can be made and refrigerated for up to 3 days before baking, or frozen for longer storage. Bake and decorate the cookies up to 2 days ahead—they’ll still be delightfully soft.
How do I keep my cookies from spreading too much?
If your cookies are spreading, try chilling the dough for 30 minutes before baking. This helps the cookies keep their shape, especially when using cookie cutters or making intricate designs.
Final Thoughts
Halloween Sugar Cookies are the ultimate way to celebrate the season—fun to make, even more fun to decorate, and truly irresistible to eat. Gather your favorite people, pick your wildest colors, and let the cookie magic begin!
Print
Halloween Sugar Cookies Recipe
- Total Time: 30 minutes
- Yield: 30 cookies 1x
- Diet: Vegetarian
Description
These Halloween Sugar Cookies are perfect for festive holiday baking. Soft, buttery, and lightly sweetened, they are decorated with colorful food coloring gels and fun Halloween-themed sprinkles to bring spooky delight to your celebration.
Ingredients
Dry Ingredients
- 2 3/4 cups all-purpose flour
- 1 teaspoon baking soda
- 1/2 teaspoon baking powder
- 1/2 teaspoon salt
Wet Ingredients
- 1 cup unsalted butter, softened
- 1 1/2 cups granulated sugar
- 1 large egg
- 1 teaspoon vanilla extract
- 1/2 teaspoon almond extract (optional)
- 3 tablespoons milk
Decorations
- Food coloring gels (orange, black, purple, green)
- Assorted Halloween sprinkles and candy eyes
Instructions
- Preheat Oven and Prepare Pans: Preheat your oven to 350°F (175°C) and line baking sheets with parchment paper to prevent sticking and ensure even baking.
- Mix Dry Ingredients: In a medium bowl, whisk together the all-purpose flour, baking soda, baking powder, and salt until evenly combined.
- Cream Butter and Sugar: In a large mixing bowl, beat the softened unsalted butter and granulated sugar together using a hand or stand mixer until the mixture is light and fluffy, which helps create tender cookies.
- Add Wet Ingredients: Incorporate the egg, vanilla extract, almond extract if using, and milk into the butter-sugar mixture. Mix well until the batter is smooth and homogeneous.
- Combine Dry and Wet Mixtures: Gradually add the dry ingredient mixture into the wet ingredients, stirring gently until just combined to avoid overmixing that can toughen the dough.
- Color the Dough: Divide the dough into portions based on how many colors you want, and add food coloring gels to each portion. Knead well to distribute color evenly.
- Form Cookies: Roll the dough into tablespoon-sized balls, then place them on the prepared baking sheets about 2 inches apart to allow room for spreading. Flatten each ball slightly with your palm or the bottom of a glass for an even shape.
- Decorate: Press Halloween-themed sprinkles or candy eyes gently onto the tops of the cookies before baking, or leave them plain to decorate later with icing.
- Bake: Bake the cookies in the preheated oven for 8 to 10 minutes, or until the edges are set but not browned to maintain softness and chewiness.
- Cool: Let the cookies cool on the baking sheet for 5 minutes to firm up, then transfer them to a wire rack to cool completely before serving or decorating further.
Notes
- For cut-out cookie shapes, chill the dough in the refrigerator for 1 hour before rolling it out to about 1/4-inch thickness. Use Halloween-themed cookie cutters to create fun shapes.
- Decorate cooled cut-out cookies with royal icing to achieve more detailed festive designs and enhanced flavor.
- Store baked cookies in an airtight container at room temperature for up to 5 days to maintain freshness.
- Prep Time: 20 minutes
- Cook Time: 10 minutes
- Category: Dessert, Holiday Treats
- Method: Baking
- Cuisine: American
Nutrition
- Serving Size: 1 cookie
- Calories: 120
- Sugar: 10g
- Sodium: 70mg
- Fat: 6g
- Saturated Fat: 4g
- Unsaturated Fat: 2g
- Trans Fat: 0g
- Carbohydrates: 15g
- Fiber: 0g
- Protein: 1g
- Cholesterol: 20mg


