Clothespin Cookies Recipe
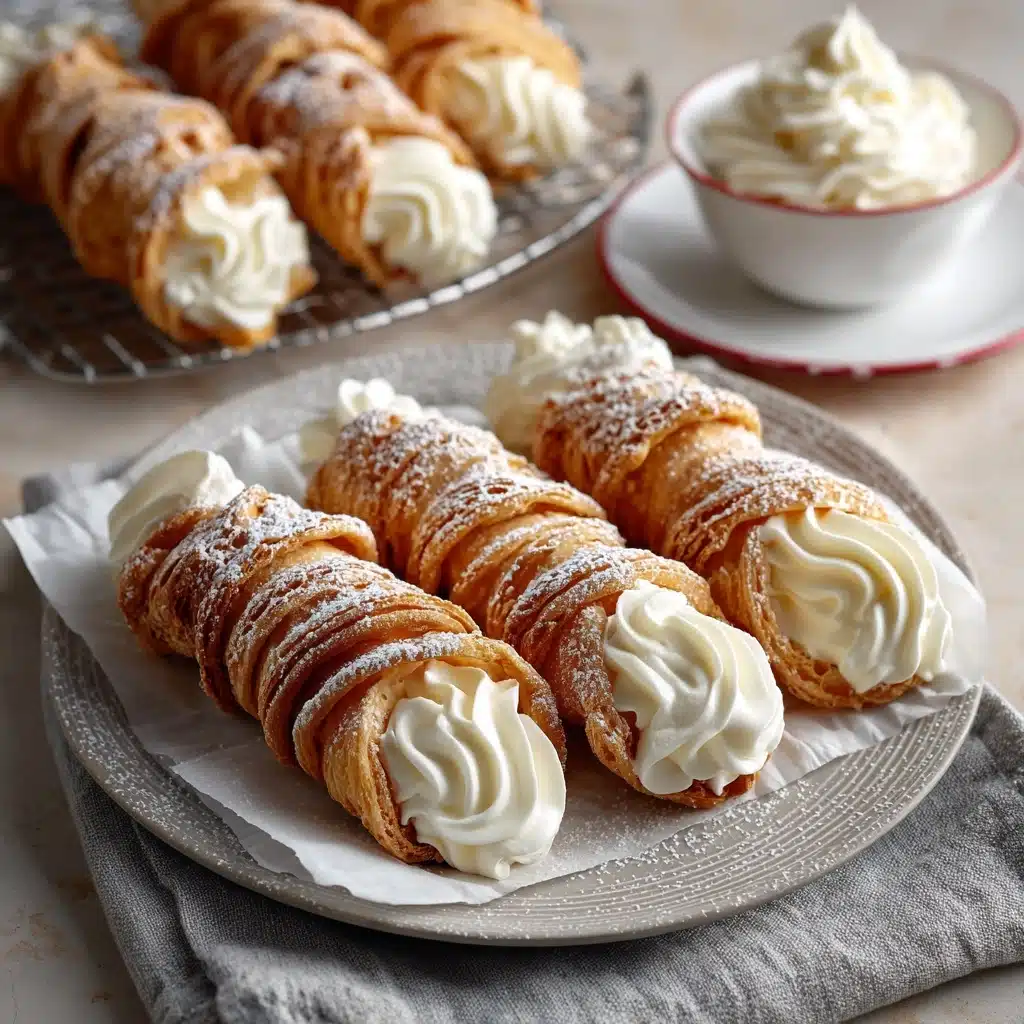
Clothespin Cookies are a delightful throwback to old-fashioned bakeries and family gatherings, combining tender, golden pastry wrapped around sweet, fluffy filling. Each bite delivers a perfect blend of buttery richness and creamy sweetness, finished off with just a hint of nostalgia. Whether you’re making these for a holiday cookie tray or just to treat yourself on a cozy weekend, Clothespin Cookies will win over anyone lucky enough to taste them. Get ready to fall in love with this irresistible, vintage cookie that’s as fun to make as it is to eat!
Ingredients You’ll Need
Ingredients You’ll Need
The beauty of Clothespin Cookies lies in their simplicity—every ingredient plays a key role in creating their distinct flavor, melt-in-your-mouth texture, and signature look. From the rich butter to the creamy filling, these pantry staples combine to create pure magic.
- All-purpose flour: Provides the structure for both the cookie shells and the filling, ensuring a tender crumb.
- Unsalted butter: Gives a rich, buttery flavor and essential moisture to both the dough and the filling.
- Vegetable shortening: Adds a light, flaky texture and helps the cookies hold their shape.
- Granulated sugar: Sweetens both the shells and the creamy filling, balancing the flavors perfectly.
- Salt: Enhances the overall taste and brings out the best in the other ingredients.
- Egg yolks: Add richness and help bind the dough for a tender texture.
- Whole milk: Keeps the dough soft and is also used in the creamy filling for extra smoothness.
- Vanilla extract: Infuses both the dough and filling with warm, aromatic flavor.
- For the filling: You’ll need whole milk, flour, butter, shortening, sugar, and vanilla again—each contributes to the dreamy, cloud-like texture inside every cookie.
How to Make Clothespin Cookies
Step 1: Make the Dough
Start by creaming together the butter, shortening, and sugar until the mixture is light and fluffy—this step sets the stage for a tender, melt-in-your-mouth cookie. Once smooth, beat in the egg yolks, vanilla, and milk to add richness and bring everything together. In another bowl, whisk the flour and salt, then slowly add it to the wet ingredients. You’ll end up with a soft, slightly sticky dough that’s easy to work with. Divide it in half, flatten into disks, wrap each in plastic, and chill for at least an hour—chilling is key for easy rolling and shaping later!
Step 2: Shape the Cookies
Preheat your oven to 350°F (175°C) and grease your clothespin or cream horn molds. Roll out the chilled dough on a floured surface to about 1/8-inch thickness. Use a sharp knife or pizza cutter to slice 1-inch wide strips, then gently wrap each strip around a mold, overlapping the edges a bit. Place the wrapped molds seam side down on a baking sheet for even baking and the prettiest results.
Step 3: Bake and Cool
Bake the cookies for 12–15 minutes, just until they turn lightly golden. Watch them closely—overbaking can make them too crisp to enjoy that signature tender bite. Let the cookies cool for a few minutes, then carefully slide them off the molds. Set them aside to cool completely before filling; patience now means perfect shells later!
Step 4: Make the Filling
For that dreamy, cloud-like filling, whisk the flour and milk in a saucepan over medium heat until thickened—stir constantly to avoid lumps. Remove from heat and let it cool completely; this step ensures your filling is silky smooth. In a mixing bowl, beat the butter, shortening, sugar, and vanilla until fluffy. Add in the cooled flour-milk mixture, then whip everything together until you have a creamy, pipeable filling worthy of your beautiful shells.
Step 5: Fill the Cookies
Transfer the filling to a piping bag (or a zip-top bag with the corner snipped off) and pipe it generously into both ends of each cooled cookie shell. For best results, chill the filled cookies before serving—this helps the filling set and intensifies the flavors.
How to Serve Clothespin Cookies
Garnishes
A dusting of powdered sugar is the classic finish for Clothespin Cookies. It adds a touch of elegance and just the right amount of extra sweetness. If you’re feeling adventurous, try dipping the ends in melted chocolate or rolling them in finely chopped nuts for a little extra flair.
Side Dishes
These cookies pair beautifully with a cup of hot coffee, tea, or even a tall glass of cold milk. For a festive cookie platter, serve alongside other vintage favorites like spritz cookies or thumbprints—your guests will love the variety!
Creative Ways to Present
Clothespin Cookies look stunning arranged in neat rows on a vintage platter, or standing upright in a glass jar. For holidays or special occasions, tie a ribbon around each cookie or place them in decorative boxes for a thoughtful homemade gift. Don’t be afraid to get creative—these cookies are just begging to be shown off!
Make Ahead and Storage
Storing Leftovers
Store filled Clothespin Cookies in an airtight container in the refrigerator for up to 5 days. The chilled environment keeps the filling fresh and maintains the delicate texture of the shells. If you’re stacking them, add a layer of parchment between each row to prevent sticking.
Freezing
For longer storage, freeze unfilled cookie shells in a zip-top bag for up to 2 months. Simply thaw at room temperature before adding the filling. While the filled cookies can also be frozen, the texture of the filling is best when freshly made and piped just before serving.
Reheating
There’s no need to reheat Clothespin Cookies, but if you like them slightly warmed, leave them out at room temperature for 20–30 minutes before serving. This softens the filling just enough for that perfect creamy bite without compromising the shell’s tender crispness.
FAQs
Can I make Clothespin Cookies without metal molds?
While metal clothespin or cream horn molds are traditional and give the best shape, you can try wrapping dough strips around thick wooden dowels or even rolled-up parchment tubes. Just be sure to grease them well to prevent sticking.
Why does my filling look grainy?
Grainy filling is usually caused by either not letting the flour-milk mixture cool completely or by not beating the ingredients long enough. For the silkiest filling, be patient and whip it until it’s smooth and fluffy.
Can I flavor the filling differently?
Absolutely! Try swapping out the vanilla extract for almond, orange, or even a splash of rum extract. You can also fold in finely chopped chocolate or citrus zest for a playful twist on classic Clothespin Cookies.
How do I keep the shells from breaking?
Let the cookies cool for a few minutes after baking, then gently twist them off the molds. If they’re too hot or too cold, they may crack—timing is everything! Always handle with care, and don’t rush the cooling process.
Can I make Clothespin Cookies ahead of time?
Definitely! You can prepare the dough and bake the shells in advance, then fill them up to a day before serving for the freshest taste and best texture. Just store the shells in an airtight container until you’re ready to assemble.
Final Thoughts
If you’ve never tried making Clothespin Cookies, you’re in for an absolute treat. Each cookie is a little work of art, bursting with old-fashioned flavor and irresistible charm. Gather your ingredients, invite a friend or two, and get ready for a baking adventure you’ll want to repeat again and again!
Print
Clothespin Cookies Recipe
- Total Time: 1 hour 30 minutes
- Yield: 24 cookies 1x
- Diet: Vegetarian
Description
Clothespin Cookies are a delightful vintage American dessert featuring flaky, golden cookie shells shaped using clothespin or cream horn molds and filled with a creamy, sweet filling. These nostalgic treats combine a tender dough with a luscious vanilla-flavored cream filling, perfect for holidays or special occasions.
Ingredients
For the Cookie Dough
- 3 1/2 cups all-purpose flour
- 1 cup unsalted butter, softened
- 1/2 cup vegetable shortening
- 1/2 cup granulated sugar
- 1/2 teaspoon salt
- 2 large egg yolks
- 1/2 cup whole milk
- 1 teaspoon vanilla extract
For the Filling
- 1 cup whole milk
- 5 tablespoons all-purpose flour
- 1/2 cup unsalted butter, softened
- 1/2 cup vegetable shortening
- 1 cup granulated sugar
- 1 teaspoon vanilla extract
Instructions
- Prepare the Dough: In a large bowl, cream together the softened butter, vegetable shortening, and sugar until the mixture is light and fluffy. Add the egg yolks, vanilla extract, and milk, mixing well to combine. In a separate bowl, whisk together the flour and salt, then gradually incorporate this dry mixture into the wet ingredients, forming a soft dough. Divide the dough into two halves, flatten each into a disk, wrap with plastic wrap, and refrigerate for at least 1 hour to firm up.
- Shape and Bake the Cookies: Preheat the oven to 350°F (175°C) and lightly grease metal clothespin or cream horn molds. On a floured surface, roll out the chilled dough to about 1/8-inch thickness. Cut the dough into 1-inch wide strips. Wrap each strip around a mold, slightly overlapping the edges to seal. Place the molds seam-side down on a baking sheet and bake for 12 to 15 minutes until the cookies are lightly golden. Allow the shells to cool slightly before carefully removing them from the molds. Let cool completely on a wire rack.
- Make the Filling: In a saucepan over medium heat, whisk together the flour and whole milk, stirring constantly until the mixture thickens. Remove from heat and cool completely. In a mixing bowl, beat together the softened butter, vegetable shortening, sugar, and vanilla extract until the mixture is light and fluffy. Add the cooled milk and flour mixture to the butter mixture and beat until smooth and creamy.
- Fill the Cookies: Using a piping bag or a small spoon, fill both ends of each cooled cookie shell with the creamy filling. Once filled, chill the cookies in the refrigerator before serving to allow the filling to set for the best texture.
Notes
- Metal clothespin or cream horn molds are essential for creating the classic hollow shape of these cookies.
- Dust the finished cookies with powdered sugar for an elegant presentation.
- Store filled cookies in an airtight container in the refrigerator for up to 5 days to maintain freshness.
- Handle the cookies gently when removing from molds to avoid breakage.
- Prep Time: 1 hour 15 minutes
- Cook Time: 15 minutes
- Category: Dessert
- Method: Baking
- Cuisine: American
Nutrition
- Serving Size: 1 cookie
- Calories: 190
- Sugar: 11g
- Sodium: 55mg
- Fat: 12g
- Saturated Fat: 6g
- Unsaturated Fat: 5g
- Trans Fat: 0g
- Carbohydrates: 19g
- Fiber: 0g
- Protein: 2g
- Cholesterol: 35mg


