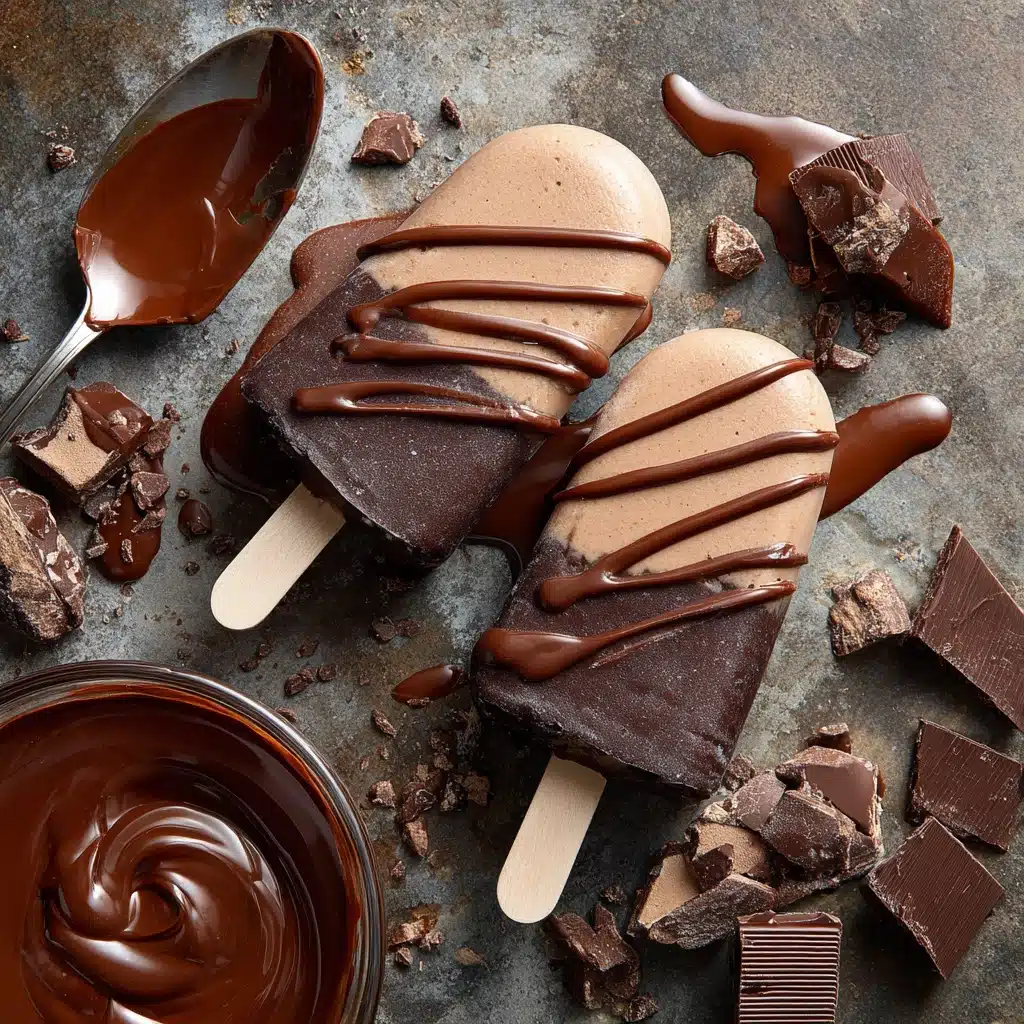
Chocolate Ice Cream Bars Recipe
If you ever find yourself wishing for a frosty, chocolate-packed treat that tastes leagues better than any store-bought version, these Chocolate Ice Cream Bars are going to make your dessert dreams come true. With a creamy, cocoa-infused center and a crackly semisweet chocolate shell, each bite is pure bliss. They’re the perfect project for a cozy afternoon, and best of all, you can customize them with your favorite toppings. This simple homemade indulgence is about to become your new freezer staple!
Ingredients You’ll Need
The magic of these Chocolate Ice Cream Bars lies in the quality and balance of just a few simple ingredients. Each plays a role in flavor, texture, and color, ensuring that every bite is rich and satisfying.
- Heavy Cream: The key to that irresistibly creamy texture that makes these bars feel so decadent.
- Whole Milk: Adds smoothness while lightening the consistency just enough to make the ice cream scoopable and blendable.
- Granulated Sugar: Balances the bitterness of the cocoa and chocolate, bringing just the right amount of sweetness.
- Unsweetened Cocoa Powder: Delivers rich, deep chocolate flavor and that iconic dark color.
- Vanilla Extract: Enhances all the chocolate notes with its subtle, warm complexity.
- Salt: Just a pinch makes all the chocolate flavors pop and keeps the sweetness in check.
- Semisweet Chocolate (melted and cooled): Intensifies the overall chocolate experience and supplies extra creaminess.
- Wooden Popsicle Sticks: Essential for that classic ice cream bar feel and for easy dipping.
- Semisweet Chocolate Chips (for coating): Melt into a luscious shell that snaps perfectly when you bite in.
- Coconut Oil: Helps the chocolate coating set quickly and gives it a beautiful glossy finish.
How to Make Chocolate Ice Cream Bars
Step 1: Make the Chocolate Base
Start by whisking together cream, milk, sugar, cocoa powder, and salt in a medium saucepan. Warm the mixture gently over medium heat, stirring often until the sugar dissolves and everything looks wonderfully cohesive. You want it warm, not boiling, so you don’t risk scorching the dairy or altering the texture.
Step 2: Add Flavor and Chocolate
Remove the pan from the heat and stir in the vanilla extract and that generous amount of melted, slightly cooled semisweet chocolate. This step delivers a velvety, glossy ice cream base loaded with rich chocolate flavor. Let the mixture cool down to room temperature before freezing—you don’t want to add hot liquid to your molds.
Step 3: Pre-Freeze the Mixture
Pour the cooled mixture into a loaf pan or a shallow dish, cover, and pop it in the freezer for 1 to 2 hours. This quick pre-freeze thickens it just enough to be scoopable—think soft serve texture, which will mold perfectly without any air pockets.
Step 4: Scoop and Mold the Bars
Scoop the semi-frozen ice cream mixture into popsicle molds, pressing it down to pack in any gaps. Slide in your wooden popsicle sticks, and then let the molds freeze thoroughly for 4 to 6 hours, or overnight. You’ll know they’re ready when they’re completely firm and easy to unmold.
Step 5: Dip in Chocolate Coating
Once the bars are solid, melt the chocolate chips with coconut oil, stirring until perfectly smooth. Working quickly, remove the bars from their molds, dip each into the chocolate, and let the excess drip off before setting them on parchment paper. The shell will set nearly instantly on the cold bars, creating that signature crack when you bite in!
How to Serve Chocolate Ice Cream Bars

Garnishes
To add flair and crunch to your Chocolate Ice Cream Bars, sprinkle on chopped nuts, cookie crumbs, or a pinch of flaky sea salt right after dipping in chocolate. The possibilities are endless—try rainbow sprinkles for a classic touch, or toasted coconut for a tropical vibe.
Side Dishes
These bars are a decadent treat on their own, but you can turn serving them into an event by pairing with fresh berries, a scoop of whipped cream, or even a little bowl of warm caramel sauce for dipping. For parties, a platter of fruit and a bowl of extra chocolate sauce keeps everyone happy.
Creative Ways to Present
For a whimsical dessert bar at gatherings, lay out the coated bars on a big platter surrounded by bowls of toppings so everyone can add their favorites. Or, wrap each bar individually in wax paper with a ribbon for charming party favors. They also make an unforgettable frozen treat for backyard barbecues—just bring them out as the grand finale and watch everyone’s eyes light up!
Make Ahead and Storage
Storing Leftovers
Keep leftover Chocolate Ice Cream Bars individually wrapped in parchment or wax paper, then place them inside a freezer-safe bag or container. This keeps them fresh, prevents freezer burn, and also makes it easy to grab a single bar whenever you crave a sweet escape.
Freezing
For best results, freeze your bars as soon as they’re dipped in chocolate. They’ll hold their shape perfectly for up to two months. If you’re making a big batch ahead of a party, you can rest easy knowing your treats will taste just as good as the day you made them.
Reheating
While you certainly don’t want to “reheat” your Chocolate Ice Cream Bars in the traditional sense, if the coating seems a bit too hard, let the bars sit at room temperature for two or three minutes before enjoying. This softens the chocolate shell just enough for the ultimate bite.
FAQs
Can I use milk chocolate instead of semisweet for the coating?
Absolutely! If you prefer a sweeter shell, substitute milk chocolate chips for the semisweet ones. Just keep in mind that milk chocolate melts differently, so go easy with the coconut oil and dip quickly.
Do I need popsicle molds, or can I use something else?
If you don’t have popsicle molds, try using small paper cups instead. Fill them with your ice cream mixture, add the sticks, and peel the cup away once the bars are frozen and ready for dipping.
Can I make Chocolate Ice Cream Bars dairy free?
Definitely! Use full-fat coconut milk in place of both the cream and milk, and swap in a dairy-free chocolate for both the melted chocolate and the coating. The coconut oil coating works perfectly for non-dairy bars as well.
Why did my chocolate coating crack or fall off?
If the bars are too cold when dipped, or the chocolate coating is too thick, you might get some cracks. Try letting the bars sit out for just a minute before dipping, and make sure your coating is smooth and fluid for an even layer.
How do I add extra flavors to the ice cream base?
Mix in a swirl of peanut butter, a handful of mini chocolate chips, or even a hint of espresso powder into your ice cream base for a fun twist. Fruits like raspberries or dried cherries also bring another layer of flavor to your Chocolate Ice Cream Bars.
Final Thoughts
There’s just something delightful about having a stash of homemade Chocolate Ice Cream Bars tucked away, ready for whenever the craving hits. They’re a crowd-pleaser and honestly just pure happiness on a stick. Give these a try—you’ll be amazed at how easy and rewarding it is to make your own frozen treats from scratch!
Print
Chocolate Ice Cream Bars Recipe
- Total Time: 6 hours 30 minutes
- Yield: 12 bars 1x
- Diet: Vegetarian
Description
Indulge in these decadent Chocolate Ice Cream Bars, a homemade frozen treat that combines rich chocolate ice cream with a crispy chocolate coating. Perfect for a refreshing dessert on a hot day or a sweet indulgence any time.
Ingredients
Ice Cream Base:
- 2 cups heavy cream
- 1 cup whole milk
- 3/4 cup granulated sugar
- 1/3 cup unsweetened cocoa powder
- 1/2 teaspoon vanilla extract
- 1/4 teaspoon salt
- 8 ounces semisweet chocolate, melted and cooled slightly
Additional Ingredients:
- 12 wooden popsicle sticks
- 12 ounces semisweet chocolate chips
- 3 tablespoons coconut oil
Instructions
- Prepare Ice Cream Mixture: In a saucepan, combine cream, milk, sugar, cocoa, and salt. Heat until warm, not boiling. Stir in vanilla and melted chocolate. Cool and freeze.
- Freeze in Molds: Transfer mixture to a pan, freeze until thickened. Scoop into molds, insert sticks, freeze until solid.
- Coat with Chocolate: Melt chocolate chips with coconut oil. Dip frozen bars in chocolate, let set on parchment paper.
- Serve: Enjoy immediately or freeze for later.
Notes
- For added texture, sprinkle chopped nuts or crushed cookies on the chocolate coating before it sets.
- Opt for high-quality chocolate for the best flavor experience.
- Prep Time: 20 minutes
- Cook Time: 10 minutes
- Category: Dessert
- Method: Freezing
- Cuisine: American
Nutrition
- Serving Size: 1 bar
- Calories: 320
- Sugar: 28g
- Sodium: 70mg
- Fat: 21g
- Saturated Fat: 13g
- Unsaturated Fat: 7g
- Trans Fat: 0g
- Carbohydrates: 33g
- Fiber: 3g
- Protein: 4g
- Cholesterol: 35mg


