Chinese Sweet and Sour Sauce Recipe
If you’re searching for that perfect balance of tangy, sweet, and just a hint of savory, you’ll absolutely adore this Chinese Sweet and Sour Sauce. It’s a kitchen staple that instantly transforms a simple meal into a vibrant feast, whether drizzled over crispy chicken, tossed with veggies, or used as the ultimate dipping sauce. This homemade version is glossy, bold, and bursting with flavor, making it a must-have for anyone who loves classic Chinese-inspired cuisine Sauce, Condiment.

Ingredients You’ll Need
-
Sauce Base
- 1/2 cup rice vinegar
- 1/2 cup ketchup
- 1/3 cup brown sugar
- 1/4 cup soy sauce
- 1/2 cup pineapple juice
Thickener
- 1 tablespoon cornstarch
- 2 tablespoons water
How to Make Chinese Sweet and Sour Sauce
Step 1: Combine the Main Ingredients
Start by grabbing a small saucepan and whisking together the rice vinegar, ketchup, brown sugar, soy sauce, and that lovely pineapple juice. This simple mix is where all the magic begins, and you’ll notice the colors and aromas come together instantly to form the familiar base of Chinese Sweet and Sour Sauce.
Step 2: Simmer to Blend Flavors
Place your saucepan over medium heat and bring the mixture to a gentle simmer. This step is all about letting those flavors meld together, coaxing out the tanginess and sweetness, while softening any sharp edges for a well-rounded sauce.
Step 3: Mix the Cornstarch Slurry
In a separate small bowl, stir the cornstarch and water together until smooth. This slurry is your secret weapon for a glossy, thick sauce that clings beautifully to every bite—no lumps allowed!
Step 4: Thicken the Sauce
Slowly pour the cornstarch slurry into the simmering sauce, whisking constantly. Keep stirring and watch as the mixture transforms, thickening in just two or three minutes to a gorgeous, shiny consistency that’s unmistakably Chinese Sweet and Sour Sauce.
Step 5: Cool and Serve
Once the sauce has thickened, remove it from the heat and let it cool slightly. It’ll continue to thicken as it cools, and the flavors will mellow into perfect harmony. Now you’re ready to use your homemade Chinese Sweet and Sour Sauce however you like!
How to Serve Chinese Sweet and Sour Sauce

Garnishes
Give your sauce an extra pop with a sprinkle of toasted sesame seeds, finely chopped green onions, or even a few fresh pineapple tidbits. These little touches add color, crunch, and a burst of freshness that make every bite special.
Side Dishes
Pair Chinese Sweet and Sour Sauce with crispy chicken, pork, tofu, or shrimp. It’s also perfect alongside steamed jasmine rice, stir-fried vegetables, or classic spring rolls—turning any plate into a restaurant-worthy spread.
Creative Ways to Present
For a fun twist, serve the sauce in a hollowed-out pineapple or small dipping bowls for sharing. Drizzle it over a sizzling stir-fry, or use it as a glaze for grilled skewers. However you use it, Chinese Sweet and Sour Sauce brings a festive flair to your table.
Make Ahead and Storage
Storing Leftovers
If you find yourself with extra Chinese Sweet and Sour Sauce (lucky you!), let it cool completely before transferring to an airtight jar or container. It’ll keep in the refrigerator for up to a week, ready to brighten up any meal at a moment’s notice.
Freezing
This sauce actually freezes beautifully! Pour cooled Chinese Sweet and Sour Sauce into a freezer-safe container, leaving a little space for expansion. It can be frozen for up to three months—just thaw overnight in the fridge when you need it.
Reheating
To reheat, simply warm the sauce gently in a saucepan over low heat, stirring occasionally. If it’s too thick, add a splash of water or pineapple juice to loosen it up. Give it a taste and adjust the seasoning if desired before serving.
FAQs
Can I make Chinese Sweet and Sour Sauce gluten-free?
Absolutely! Just be sure to use a gluten-free soy sauce or tamari. All the other ingredients are naturally gluten-free, so it’s an easy swap for anyone with dietary restrictions.
How do I adjust the sweetness or tanginess?
If you prefer a sweeter sauce, add a little extra brown sugar. For more tang, simply increase the rice vinegar or pineapple juice. Taste as you go, and make it your own!
Is this sauce spicy?
The basic recipe for Chinese Sweet and Sour Sauce isn’t spicy at all—it’s all about that balance of sweet and tangy. If you want a kick, stir in a pinch of red pepper flakes or a dab of chili paste.
Can I use fresh pineapple juice?
Yes, fresh pineapple juice works wonderfully and adds an even brighter flavor. Just strain out any pulp before adding it to the sauce for the smoothest texture.
What can I use this sauce for besides dipping?
Chinese Sweet and Sour Sauce is incredibly versatile! Use it as a glaze for meats or tofu, a flavorful stir-fry sauce, or even as a drizzle over fried rice or noodles.
Final Thoughts
Now that you know just how simple and rewarding it is to make Chinese Sweet and Sour Sauce from scratch, I hope you’re inspired to whip up a batch soon. There’s nothing like seeing your favorite takeout flavors come to life in your very own kitchen—give it a try and watch your meals shine!
Print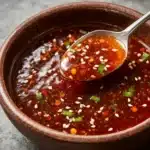
Chinese Sweet and Sour Sauce Recipe
- Total Time: 10 minutes
- Yield: 1 1/2 cups 1x
- Diet: Vegan
Description
This homemade Chinese Sweet and Sour Sauce is a vibrant, tangy, and sweet condiment perfect for enhancing chicken, pork, or vegetable dishes. Made with simple pantry ingredients like rice vinegar, ketchup, brown sugar, soy sauce, and pineapple juice, this sauce balances sweet and tangy flavors with a glossy, thick texture. Quick and easy to prepare on the stovetop, it’s ideal as a dipping sauce or a flavorful glaze for your favorite stir-fries.
Ingredients
Sauce Base
- 1/2 cup rice vinegar
- 1/2 cup ketchup
- 1/3 cup brown sugar
- 1/4 cup soy sauce
- 1/2 cup pineapple juice
Thickener
- 1 tablespoon cornstarch
- 2 tablespoons water
Instructions
- Combine Ingredients: In a small saucepan, whisk together the rice vinegar, ketchup, brown sugar, soy sauce, and pineapple juice until fully blended.
- Simmer Sauce: Place the saucepan over medium heat and bring the mixture to a gentle simmer, stirring occasionally to prevent burning.
- Prepare Slurry: In a small separate bowl, mix the cornstarch and water to form a smooth slurry without any lumps.
- Thicken Sauce: Slowly pour the cornstarch slurry into the simmering sauce while whisking continuously to ensure even thickening and prevent clumps.
- Cook Until Glossy: Continue cooking and stirring the sauce for 2 to 3 minutes, until it thickens and achieves a glossy appearance.
- Cool and Serve: Remove the saucepan from heat and let the sauce cool slightly before using. Serve immediately as a dipping sauce or pour over chicken, pork, or vegetables for extra flavor.
Notes
- Adjust sweetness by adding more or less brown sugar according to your taste preference.
- For a spicy kick, add a pinch of red pepper flakes or a teaspoon of chili paste into the sauce while simmering.
- This sauce can be prepared ahead of time and refrigerated in an airtight container for up to 1 week.
- Reheat gently on the stovetop before serving to restore its smooth texture.
- Prep Time: 5 minutes
- Cook Time: 5 minutes
- Category: Sauce, Condiment
- Method: Stovetop
- Cuisine: Chinese
Nutrition
- Serving Size: 2 tablespoons
- Calories: 45
- Sugar: 9 g
- Sodium: 270 mg
- Fat: 0 g
- Saturated Fat: 0 g
- Unsaturated Fat: 0 g
- Trans Fat: 0 g
- Carbohydrates: 11 g
- Fiber: 0 g
- Protein: 0 g
- Cholesterol: 0 mg


