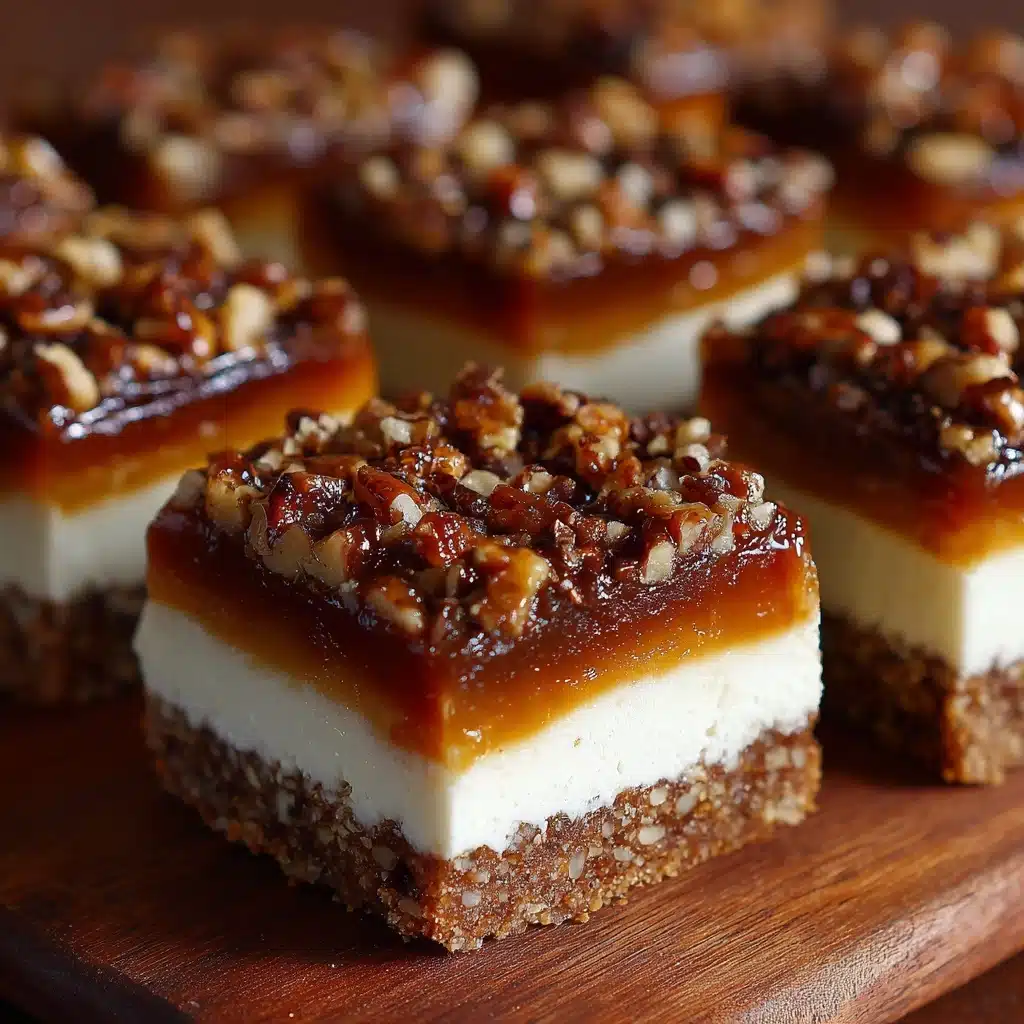
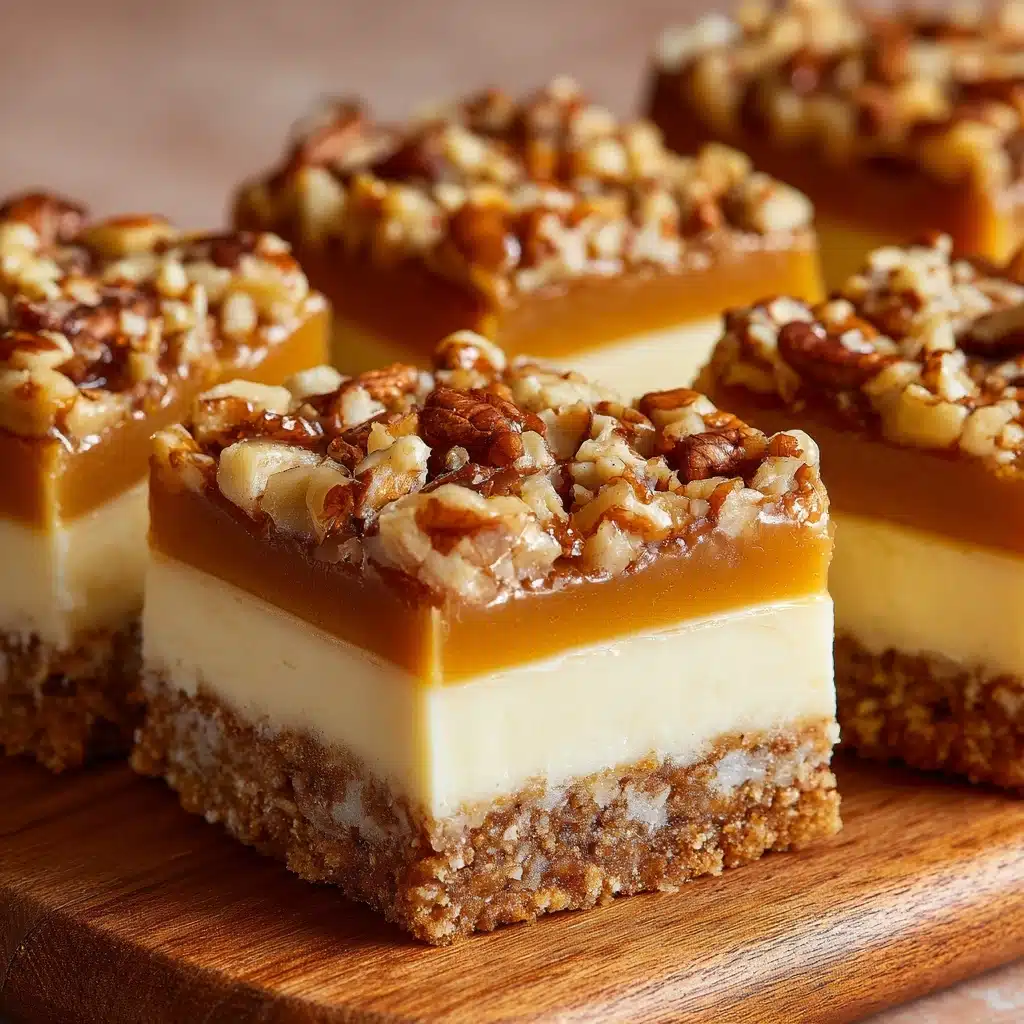
Baklava Cheesecake Bars Recipe
If you’re searching for a showstopping dessert that marries creamy cheesecake with the irresistible crunch and honeyed flavors of baklava, these Baklava Cheesecake Bars are your dream come true. With a buttery graham cracker crust, layers of spiced nuts and smooth cheesecake, and a golden drizzle of lemony honey syrup, every bite is a burst of texture and taste. Whether you’re making them for a holiday, a special gathering, or just because you crave something extraordinary, you’ll find yourself coming back to this recipe again and again.
Ingredients You’ll Need
Gathering the ingredients for Baklava Cheesecake Bars is refreshingly simple, but each one plays a starring role in delivering that signature flavor, texture, and color. From the deep nuttiness of walnuts and pistachios to the creamy decadence of the cheesecake layer, every component adds something special.
- Graham cracker crumbs: The perfect crunchy base that soaks up the flavors and holds everything together.
- Unsalted butter (melted): Brings richness to the crust and ensures it sets up beautifully.
- Granulated sugar: Adds sweetness to both the crust and cheesecake layers, balancing the tang of the cream cheese.
- Ground cinnamon: Lends warmth and spice, essential for that classic baklava taste.
- Finely chopped walnuts: Delivers a robust, earthy crunch in every bite.
- Finely chopped pistachios: Provides vibrant color and a subtle, buttery flavor.
- Honey: The star sweetener that ties the baklava and syrupy finish together.
- Cream cheese (softened): Creates the luscious, creamy cheesecake layer.
- Large eggs: Bind the cheesecake filling and help it set to perfection.
- Vanilla extract: Adds a comforting note of sweetness and rounds out the cheesecake flavor.
- Water: Helps thin the syrup so it soaks in evenly.
- Lemon juice: Brightens the syrup and balances the sweetness.
How to Make Baklava Cheesecake Bars
Step 1: Prepare Your Pan and Crust
Start by preheating your oven to 325°F (165°C) and lining an 8×8-inch baking pan with parchment paper. This not only prevents sticking but also makes it a breeze to lift out your Baklava Cheesecake Bars later. In a medium bowl, combine the graham cracker crumbs, melted butter, granulated sugar, and ground cinnamon. Stir until everything looks like wet sand—this ensures every bite of crust is flavorful. Press the mixture firmly and evenly into the bottom of your prepared pan, using the bottom of a measuring cup to pack it down.
Step 2: Layer the Nuts and Honey
In another bowl, mix together the finely chopped walnuts, pistachios, and honey. The honey acts as a glue, binding the nuts and adding that signature baklava sweetness. Spread this nutty mixture evenly over your graham cracker crust, making sure to reach every corner. This layer is where the baklava magic truly begins!
Step 3: Whip Up the Cheesecake Filling
Next, grab a large mixing bowl and beat the softened cream cheese and sugar together until the mixture is silky smooth and lump-free. Add the eggs one at a time, beating well after each, then stir in the vanilla extract for that extra hint of sweetness. Pour the cheesecake batter over the nut layer and use a spatula to smooth out the top so it bakes evenly.
Step 4: Bake to Perfection
Slide your pan into the oven and bake for 35 to 40 minutes. You’ll know it’s ready when the center looks set and the edges are just starting to turn golden. Don’t worry if there’s a slight jiggle in the middle—it will firm up as it cools.
Step 5: Make the Honey-Lemon Syrup
While the bars are baking, prepare the syrup: Combine honey, water, lemon juice, and cinnamon in a small saucepan. Bring to a simmer over medium heat, stirring occasionally, and cook for 2 to 3 minutes until slightly thickened. Remove it from the heat and let it cool just a bit; you want it warm but not boiling hot.
Step 6: Pour and Chill
As soon as the cheesecake comes out of the oven, pour the warm syrup evenly over the top. This step is pure magic—the syrup seeps into every nook, infusing the bars with flavor and gloss. Let the bars cool to room temperature, then refrigerate for at least 3 hours (overnight is even better!). This chilling time sets the layers and makes slicing neat and easy.
How to Serve Baklava Cheesecake Bars
Garnishes
For an extra flourish, sprinkle additional chopped pistachios and walnuts over the chilled bars right before serving. A light dusting of ground cinnamon or a drizzle of honey adds an inviting sparkle and deepens the flavor even more. If you’re feeling fancy, a tiny sprinkle of edible rose petals or gold leaf can make your Baklava Cheesecake Bars look positively regal!
Side Dishes
These bars are rich and satisfying, so they pair beautifully with a refreshing fruit salad or a scoop of tangy Greek yogurt. For a special treat, serve them alongside hot mint tea or strong Turkish coffee—the contrast of creamy, sweet, and spiced flavors is unforgettable.
Creative Ways to Present
Stack the sliced bars on a tiered dessert tray for a party, or wrap individual pieces in parchment and tie with twine for a sweet takeaway favor. You could also cut them into triangles for a more traditional baklava shape, or serve miniature versions as part of a dessert sampler platter. However you choose to present them, Baklava Cheesecake Bars are guaranteed to steal the show.
Make Ahead and Storage
Storing Leftovers
Keep any leftover Baklava Cheesecake Bars in an airtight container in the refrigerator. They’ll stay fresh for up to five days, and the flavors actually deepen and meld beautifully as they sit. Be sure to separate layers with parchment paper if you’re stacking them, to keep the syrupy tops from sticking together.
Freezing
Yes, you can freeze Baklava Cheesecake Bars! Wrap each bar tightly in plastic wrap and place them in a zip-top freezer bag. They’ll keep well for up to two months. Thaw the bars overnight in the refrigerator for the best texture and flavor before serving.
Reheating
While these bars are delicious cold, if you prefer them a little closer to room temperature, simply let them sit out for about 30 minutes before serving. Avoid microwaving, as it can make the cheesecake layer too soft and the crust a bit soggy.
FAQs
Can I use different nuts in Baklava Cheesecake Bars?
Absolutely! While walnuts and pistachios are traditional and provide fantastic flavor and color, you can swap in pecans, almonds, or even hazelnuts for a unique twist. Just be sure the nuts are finely chopped so the bars slice cleanly.
What’s the best way to get clean slices?
Use a sharp knife and wipe it clean between each cut. For extra precision, dip the knife in hot water and dry it off before slicing—this helps glide through the creamy cheesecake and nutty layers without sticking.
Can I make Baklava Cheesecake Bars gluten-free?
Yes! Substitute the graham cracker crumbs with your favorite gluten-free graham crackers or cookie crumbs, and double-check all other packaged ingredients to ensure they’re gluten-free. The rest of the recipe stays the same!
Why does my cheesecake layer crack?
Cracking usually happens if the cheesecake is overbaked or cools too quickly. Taking the bars out as soon as they’re set and letting them cool gradually at room temperature before chilling in the fridge will help preserve that smooth, creamy top.
Can I double the recipe for a crowd?
You sure can! Simply double all the ingredients and bake the bars in a 9×13-inch pan. You may need to add a few extra minutes to the baking time, so keep an eye on the center for doneness.
Final Thoughts
There’s something truly magical about the fusion of baklava and cheesecake, and these Baklava Cheesecake Bars bring all the best elements of both worlds to your table. I can’t wait for you to try them—whether it’s your first bite or your fiftieth, they’re bound to become a new favorite in your dessert lineup!
Print
Baklava Cheesecake Bars Recipe
- Total Time: 1 hour 20 minutes (including 3 hours chilling time)
- Yield: 16 bars 1x
- Diet: Non-Vegetarian
Description
These Baklava Cheesecake Bars combine the rich and creamy texture of classic cheesecake with the nutty, honeyed layers of traditional baklava. Featuring a crispy graham cracker crust topped with a luscious cream cheese layer and a spiced nutty baklava topping, finished with a warm honey syrup glaze, they’re a decadent dessert perfect for Middle Eastern-inspired flavor lovers.
Ingredients
For the crust and baklava layer:
- 1 cup graham cracker crumbs
- 1/2 cup unsalted butter (melted)
- 1/4 cup granulated sugar
- 1/2 teaspoon ground cinnamon
- 1 cup finely chopped walnuts
- 1/2 cup finely chopped pistachios
- 1/4 cup honey
For the cheesecake layer:
- 16 ounces cream cheese (softened)
- 1/2 cup granulated sugar
- 2 large eggs
- 1 teaspoon vanilla extract
For the syrup topping:
- 1/4 cup honey
- 2 tablespoons water
- 1 tablespoon lemon juice
- 1/4 teaspoon cinnamon
Instructions
- Prepare the crust and baklava layer: Preheat the oven to 325°F (165°C) and line an 8×8-inch baking pan with parchment paper. In a bowl, mix graham cracker crumbs, melted butter, sugar, and cinnamon until well combined. Press the mixture firmly into the bottom of the prepared pan to form an even crust. Then, in another bowl, combine the chopped walnuts, pistachios, and honey. Spread this nut mixture evenly over the crust layer.
- Make the cheesecake layer: In a separate bowl, beat the softened cream cheese and sugar together until smooth and creamy. Add the eggs one at a time, beating well after each addition to incorporate thoroughly. Stir in the vanilla extract for flavor. Pour the cheesecake batter over the nut layer, spreading it evenly with a spatula to smooth the top.
- Bake the bars: Place the pan in the preheated oven and bake for 35 to 40 minutes, or until the center is set but still slightly jiggly and the edges begin to turn golden brown. Remove from oven once done carefully.
- Prepare the syrup topping: While the bars bake, combine honey, water, lemon juice, and cinnamon in a small saucepan. Bring the mixture to a gentle simmer over medium heat and cook for 2 to 3 minutes, allowing the flavors to meld and the syrup to thicken slightly. Remove from heat and let cool briefly.
- Finish and chill: As soon as you remove the cheesecake bars from the oven, pour the warm syrup evenly over the top to soak in while still warm. Allow the bars to cool to room temperature, then transfer to the refrigerator to chill for at least 3 hours to set properly before slicing.
Notes
- For an extra crunchy texture, sprinkle additional chopped walnuts and pistachios over the top before serving.
- These bars can be prepared one day in advance and tend to develop even richer flavors after chilling overnight.
- Use parchment paper to make removal from the pan easy and clean.
- If preferred, substitute pistachios with almonds for a different nutty profile.
- Prep Time: 20 minutes
- Cook Time: 40 minutes
- Category: Dessert
- Method: Baking
- Cuisine: Middle Eastern-Inspired
Nutrition
- Serving Size: 1 bar
- Calories: 280
- Sugar: 18g
- Sodium: 120mg
- Fat: 20g
- Saturated Fat: 9g
- Unsaturated Fat: 9g
- Trans Fat: 0g
- Carbohydrates: 22g
- Fiber: 1g
- Protein: 4g
- Cholesterol: 50mg


