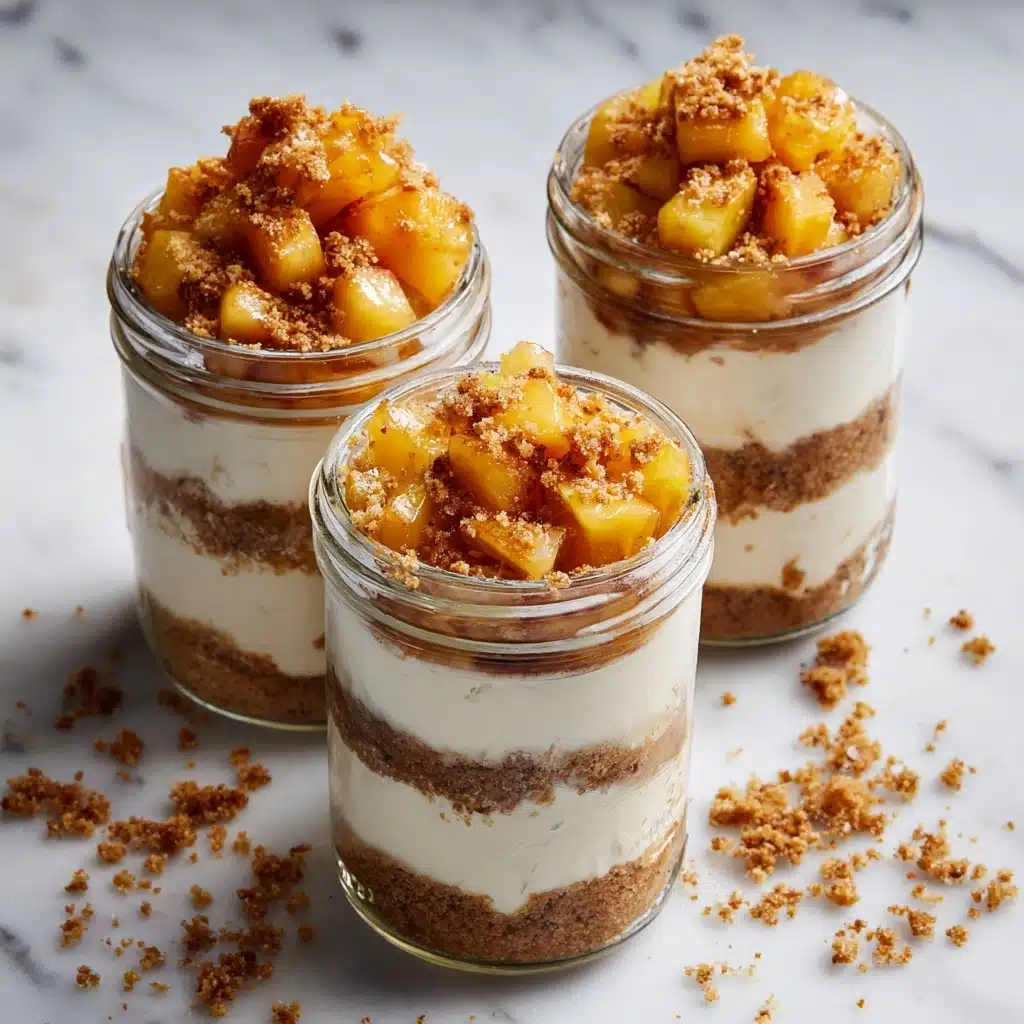
No-Bake Apple Cheesecake Jars Recipe
If you’re looking for an absolute showstopper of a dessert with all the cozy fall flavors and none of the oven anxiety, you are going to swoon over these No-Bake Apple Cheesecake Jars! Sweet, cinnamony apples are layered over a tangy, ultra-creamy cheesecake filling and buttery graham cracker crust. Not only do they come together in minutes, but each jar captures the perfect bite of spiced apple, silky cheesecake, and golden crunch. It’s my favorite way to satisfy that apple pie craving without the fuss—or the wait. Plus, they’re adorable to serve at any gathering, or just a treat-yourself weeknight delight!
Ingredients You’ll Need
With just a handful of everyday ingredients, you’ll build a dessert with layers of flavor, texture, and mouthwatering charm. Each ingredient brings something essential, whether it’s creaminess, crunch, sweetness, or that hint of cinnamon warmth.
- Graham cracker crumbs: These give you the classic cheesecake crunch, plus a toasty flavor that balances the creamy layers.
- Melted butter: Melted butter pulls the crust together and gives every bite a rich, satisfying texture.
- Brown sugar: Adds a hint of caramel flavor and moisture, taking that crust to another level.
- Cream cheese (softened): The main character—rich, tangy, creamy, and the signature of every great cheesecake jar.
- Greek yogurt or sour cream: This secret ingredient keeps the filling extra smooth and light.
- Powdered sugar: For a perfectly sweet cheesecake without any graininess.
- Vanilla extract: One little spoonful brings the whole cheesecake filling to decadent, dreamy heights.
- Apple pie filling or sautéed cinnamon apples: Layer on the cozy, fall-inspired apple flavor we crave!
- Whipped cream and cinnamon (optional): For an irresistible final touch and a pop of pretty on top.
How to Make No-Bake Apple Cheesecake Jars
Step 1: Make the Buttery Graham Cracker Crust
In a small bowl, combine the graham cracker crumbs, melted butter, and brown sugar. Mix until the texture resembles wet sand—easy but so satisfying! Divide the mixture among four small jars or glasses, pressing down gently to form a firm, buttery base for your No-Bake Apple Cheesecake Jars. That base is going to soak up just enough filling for each perfect bite.
Step 2: Whip Up the Creamy Cheesecake Layer
Using a hand mixer or a whisk, beat the softened cream cheese until smooth and totally lump-free. Then add Greek yogurt (or sour cream), powdered sugar, and vanilla extract. Keep beating until it’s light, fluffy, and beautifully creamy. Layer or pipe this cheesecake goodness right over each crust—don’t worry about perfection, those swoops look extra inviting!
Step 3: Load on the Apple Pie Topping
Spoon a generous amount of apple pie filling or homemade sautéed apples over the cheesecake layer in each jar. Those spiced apples truly complete the No-Bake Apple Cheesecake Jars, adding that juicy burst of classic fall flavor. If you like extra cinnamon or a pinch of nutmeg, now’s the moment to sprinkle it in!
Step 4: Chill for the Perfect Texture
Cover each jar and let them chill in the fridge for at least one hour. This little rest gives the crust time to firm up and makes the cheesecake layer luxuriously set—and it’s worth the wait, I promise!
Step 5: Add Whipped Cream and Cinnamon Magic
When you’re ready to serve, top each jar with a poof of whipped cream and a dusting of cinnamon. These little touches make every bite of your No-Bake Apple Cheesecake Jars taste extra special, even if it’s just a Thursday night treat!
How to Serve No-Bake Apple Cheesecake Jars

Garnishes
The easiest way to make these jars pop is with a swirl of freshly whipped cream and a light sprinkle of cinnamon or even apple pie spice. If you want to get a little fancy, a caramel drizzle or a few crushed graham crackers on top will make them look irresistible and taste even better.
Side Dishes
Serve your No-Bake Apple Cheesecake Jars with crisp apple slices for dipping, or pair them with a cozy cup of chai or hot cider. They’re lovely next to a simple bowl of berries or a crunchy oat cookie if you want to turn dessert into a true mini buffet.
Creative Ways to Present
Individual jars are always adorable, but you can also layer the dessert in stemless wine glasses, cocktail tumblers, or even mini mason jars for a rustic touch. For a party, set out all the components as a build-your-own cheesecake bar—everyone picks their own toppings and gets in on the fun!
Make Ahead and Storage
Storing Leftovers
If you have leftovers (lucky you!), just pop lids or plastic wrap on the jars and store them in the refrigerator. The No-Bake Apple Cheesecake Jars stay fresh and delicious for up to 2 days, making them perfect for prepping ahead of time.
Freezing
While you can technically freeze cheesecake jars, the texture of the apples and cheesecake filling will change once thawed. If you need to freeze, do so before adding the apple topping, and wrap the jars well. Defrost in the fridge overnight before topping and serving.
Reheating
These are designed to be enjoyed cold or at room temperature, so there’s no need to reheat them. If they’ve been in the fridge for a while, just let a jar sit out for ten minutes before enjoying to get the creamiest, dreamiest bite.
FAQs
Can I use homemade apple pie filling?
Absolutely! Homemade apple pie filling or even sautéed cinnamon apples will bring extra freshness and a personal touch to your No-Bake Apple Cheesecake Jars. Just make sure they’re completely cooled before layering onto the cheesecake filling.
Is there a substitute for Greek yogurt?
If you prefer, swap the Greek yogurt for sour cream or even mascarpone. Each brings a slightly different flavor, but all keep the filling just as creamy and rich.
How far in advance can I prepare these jars?
You can prepare No-Bake Apple Cheesecake Jars up to 2 days in advance. Just keep them sealed and refrigerated, adding the whipped cream and final cinnamon dusting right before serving for the best texture.
What if I don’t have individual jars?
No worries—use small glasses, ramekins, or even disposable cups. As long as you can layer the ingredients, any small container works beautifully for this recipe.
Can I make these gluten-free?
Yes! Simply use gluten-free graham crackers or your favorite gluten-free cookie for the crust and all the other ingredients remain naturally gluten-free. Your No-Bake Apple Cheesecake Jars will be just as delightful.
Final Thoughts
These No-Bake Apple Cheesecake Jars truly are my go-to when I want to wow friends or just treat myself to something special with minimal effort. If you crave the comfort of apple pie and the creamy decadence of cheesecake, I can’t recommend these enough—give them a try and see how quickly they become a new favorite in your dessert rotation!
Print
No-Bake Apple Cheesecake Jars Recipe
- Total Time: 15 minutes (plus chill time)
- Yield: 4 jars 1x
- Diet: Non-Vegetarian
Description
Indulge in the delightful flavors of fall with these No-Bake Apple Cheesecake Jars. Creamy cheesecake filling layered over a buttery graham cracker crust and topped with apple pie filling, these individual desserts are a perfect treat.
Ingredients
Graham Cracker Crust:
- 1 cup graham cracker crumbs
- 3 tablespoons melted butter
- 2 tablespoons brown sugar
Cheesecake Filling:
- 8 oz cream cheese (softened)
- ½ cup Greek yogurt or sour cream
- ⅓ cup powdered sugar
- 1 teaspoon vanilla extract
Topping:
- 1 cup apple pie filling or sautéed cinnamon apples
- whipped cream and cinnamon for topping (optional)
Instructions
- Graham Cracker Crust: In a small bowl, mix graham cracker crumbs, melted butter, and brown sugar until the texture resembles wet sand. Divide evenly among 4 small jars or cups, pressing down gently to form the crust layer.
- Cheesecake Filling: In a medium bowl, beat softened cream cheese until smooth. Add Greek yogurt, powdered sugar, and vanilla extract, and beat until creamy and well combined. Spoon or pipe the cheesecake filling evenly over the crust in each jar.
- Assembly: Top each with a generous spoonful of apple pie filling or sautéed apples. Cover and refrigerate for at least 1 hour before serving. Top with whipped cream and a dash of cinnamon, if desired.
Notes
- For homemade apple topping, sauté 2 chopped apples with 1 tablespoon butter, 1 tablespoon brown sugar, and ½ teaspoon cinnamon until soft.
- These jars can be made up to 2 days in advance and stored in the fridge.
- Prep Time: 15 minutes
- Cook Time: 0 minutes
- Category: Dessert
- Method: No-Bake
- Cuisine: American
Nutrition
- Serving Size: 1 jar
- Calories: 320
- Sugar: 20g
- Sodium: 220mg
- Fat: 20g
- Saturated Fat: 11g
- Unsaturated Fat: 7g
- Trans Fat: 0g
- Carbohydrates: 30g
- Fiber: 1g
- Protein: 5g
- Cholesterol: 50mg


